Auto-ducking is great, but what if you also want to stream the audio via OBS and mute accordingly? In my case I stream both my position’s radio communications (typically tower) as well as other controllers on above or below me (typically ground or departure). I want to mute the other positions whenever there’s radio traffic on my frequency.
Here’s how to do it.
Step 1: Add the audio sources to OBS
In the sources pane click the + button and select Audio Input Capture. Name the input VATSIM – Primary and set the device to Voicemeeter out B1 (VB-Audio Voicemeeter VAIO).
Create a second Audio Input Capture source, name it VATSIM – Secondary and set the device to Voicemeeter out B2 (VB-Audio Voicemeeter VAIO).
Step 2: Route the VATSIM audio in VoiceMeeter
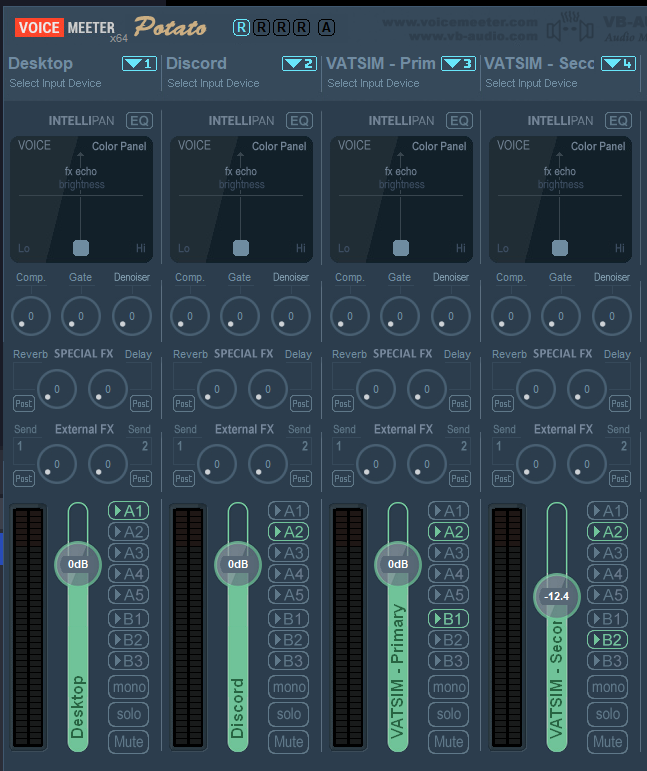
In VoiceMeeter click the B1 button for the VATSIM – Primary input and the B2 button for the VATSIM – Secondary input. This will route input 3 to B1 and input 4 to B2 in addition to sending those inputs to your headset.
VoiceMeeter should look like this:
At this point you can test and make sure that audio from VectorAudio flows out to your stream.
Step 3: Add mute and unmute hotkeys in OBS for the VATSIM – Secondary source
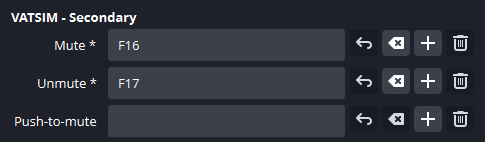
Click Settings and go to the Hotkeys tab. Use the filter box to filter for mute, then scroll until you find the fields for VATSIM – Secondary. Assign a hotkey for Mute and Unmute. (As tempting as it is to use Push-to-mute I never could get that to work).
When you’re done it should look like this:
If you are using extended function keys (F13 and higher) it is a giant pain to actually get OBS to know about them since you have to actually press the key. I worked around this by mapping a button on my StreamDeck to send the function key using the Super Macro Keystroke PTT command.
Step 4: Update the MacroButtons to send the mute and unmute keys
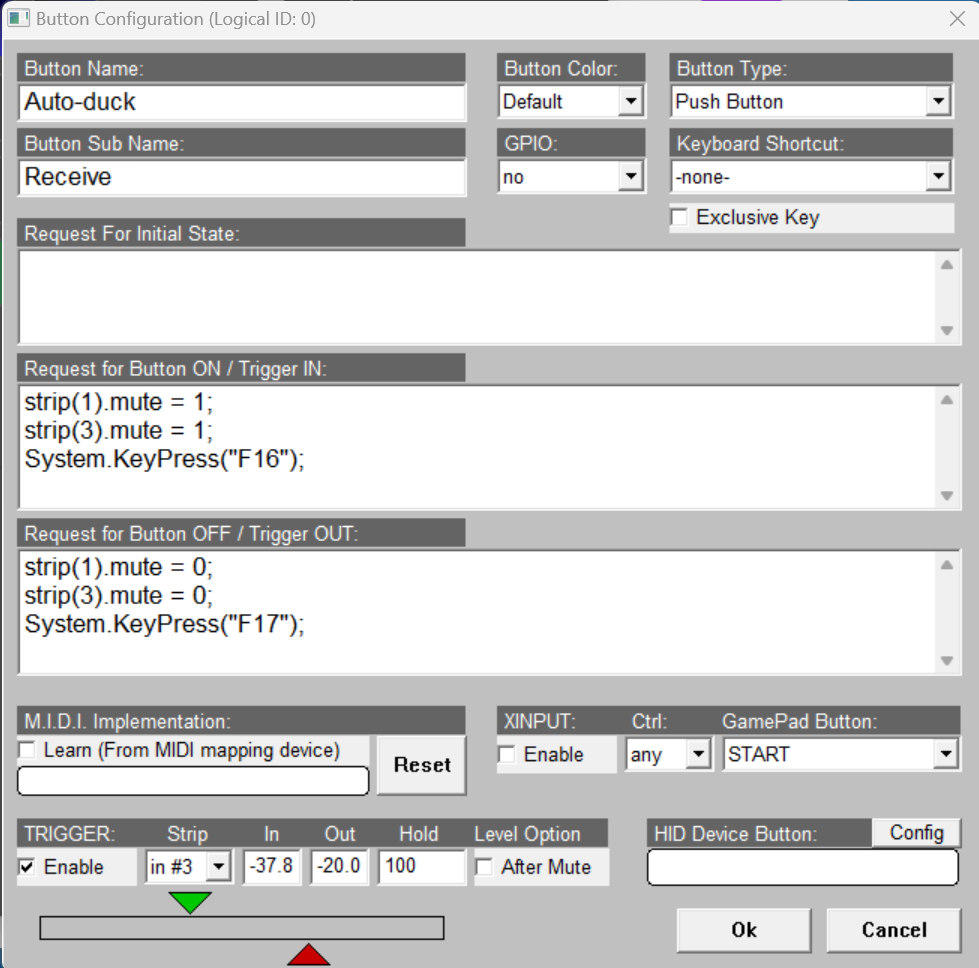
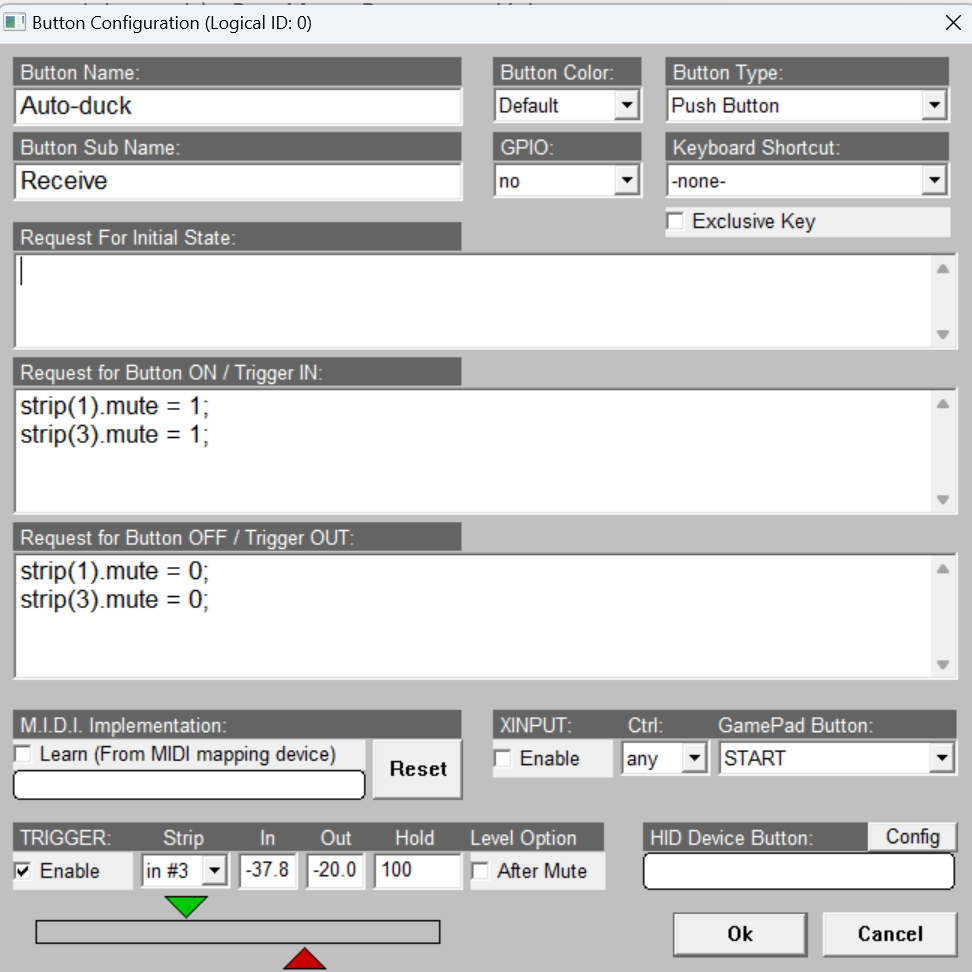
Right click on the Auto-duck – receive button in the VoiceMeeter macro button app. Add the script commands to send your mute key on trigger in and unmute key on trigger out:
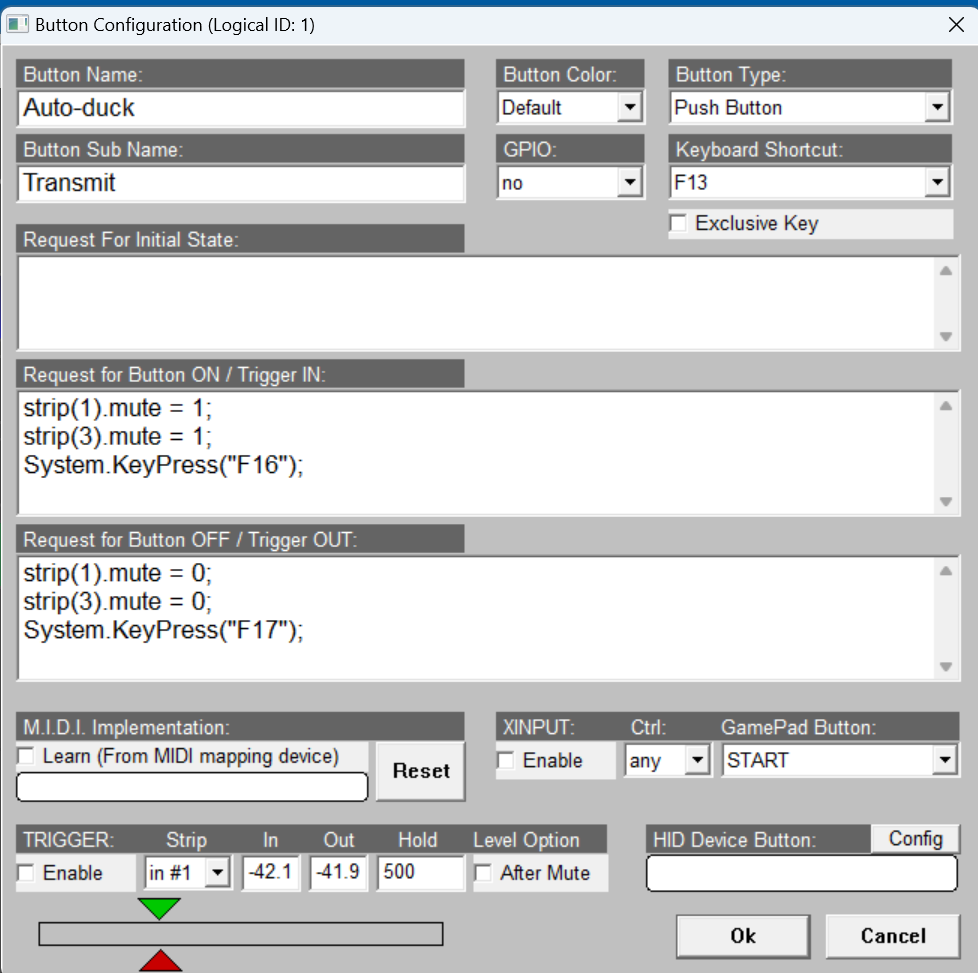
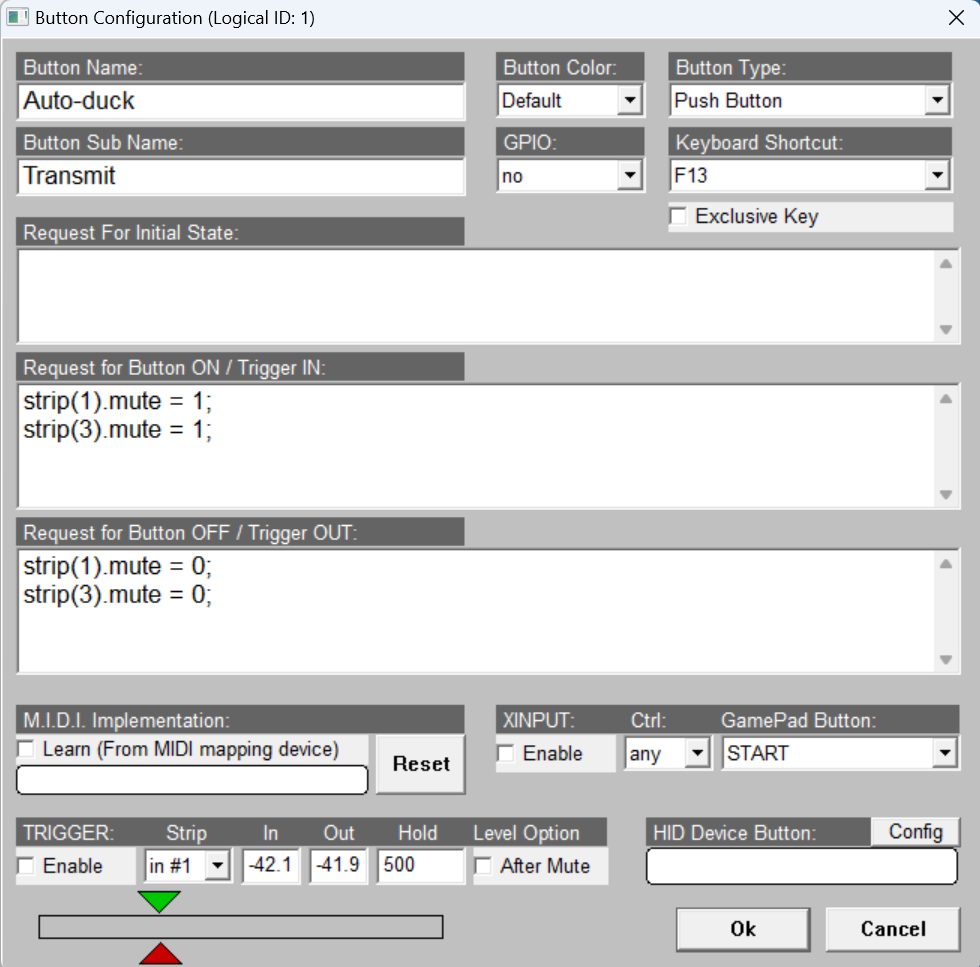
Then right click on the Auto-duck – transmit button and add the same script commands:
Other variations
While this specifically shows auto-muting the VATSIM – Secondary source in OBSyou could do any number of other things in OBS, provided there’s a mappable hotkey for it. Basically just send the hotkey from VoiceMeeter MacroButtons and then trigger whatever action you want in OBS. Nice!
Step 1: Enable MacroButtons startup in VoiceMeeter
In the Menu select Run MacroButtons on Voicemeeter start. This will bring up the MacroButtons window.
Resize the window so there are two buttons visible.
Step 2: Create a macro to mute channels on incoming VATSIM audio
Right click on the first button and configure it as follows:
Make sure to check the Enable checkbox in the trigger section.
This configuration will listen for audio coming in on channel 3 (VATSIM – Primary) and while that trigger is active will mute the Discord and VATSIM – Secondary channels. Once the incoming audio stops the other two channels will be unmuted. You can use the green and red arrows to adjust the incoming audio levels required to trigger mute and unmute respectively.
Note that the scripts use origin 0 for indexing the channels while the trigger uses origin 1. That’s why it is in #3 to select VATSIM – Primary as the trigger source but 1 and 3 to select input 2 and input 4 for muting. Confusing? Yes.
If you also want to mute desktop audio you can add strip(0).mute = 0; and strip(0).mute = 1; to the scripts as well.
Step 3: Create a macro to mute channels on outgoing VATSIM audio
The macro created in step 2 will only detect incoming audio. To apply the same auto-ducking when transmitting right click on the second button and configure it as follows:
Set the Keyboard Shortcut dropdown to match the PTT key you use in VectorAudio. The scripts are the same as the macro configured in step 2.
Other variations
This basic framework opens up all sorts of possibilities. Instead of completely muting audio you can use the fadeto command to reduce the audio of specific channels:
strip(1).fadeto = (-15.0, 100);
and then the reverse to bring it back up after transmission is complete:
strip(1).fadeto = (0.0, 200);
You can also mix and match, for example mute the secondary VATSIM audio completely but only fade the Discord audio.
Many more options are available, basically whatever you can control via the VoiceMeeter UI you can also set via macros. See the VoiceMeeter user manual for all the details.
You can also use macros to mute and unmute these sources in OBS, which is super handy if you are streaming primary and secondary VATSIM audio and want to focus on the primary position radio traffic when it’s active.
With VoiceMeeter Potato and TrackAudio it is possible to route Discord, VATSIM audio, and desktop audio independently and control each app’s audio via macros. It’s a powerful way to do things like auto-mute Discord when VATSIM audio happens, listen to multiple VATSIM frequencies at once but auto-duck frequencies when the one you’re controlling has audio traffic, route some audio to your headset and other audio to your PC speakers, etc.
Step 1: Install and license VoiceMeeter Potato and the VAIO Extension
Grab the latest version of VoiceMeeter Potato, install it, then reboot your computer. Rebooting is really important. Don’t skip that step.
After rebooting, license the VAIO Extension by going to Menu > VAIO License Extension… and following the license flow. You must license the VAIO Extension to get access to make this work. It’s totally worth it. Help support amazing software by giving the developer some money.
Additionally go to the Menu in VoiceMeeter and enable Run on Windows Startup.
Step 2: Configure each application’s audio output
The goal is to get all the different apps to feed in to VoiceMeeter on separate inputs. Here’s a table of how everything should be mapped:
Application
Output device
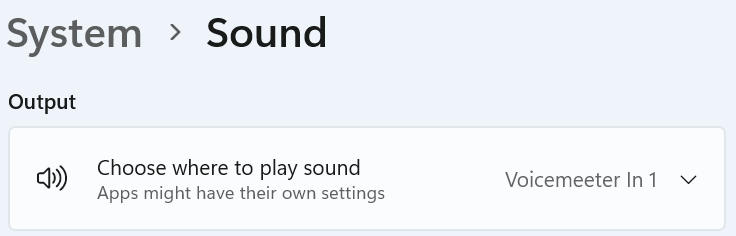
Windows
Voicemeeter In 1 (VB-Audio Voicemeeter VAIO)
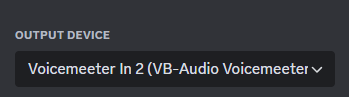
Discord
Voicemeeter In 2 (VB-Audio Voicemeeter VAIO)
TrackAudio Headset Device
Voicemeeter In 3 (VB-Audio Voicemeeter VAIO)
TrackAudio Speaker Device
Voicemeeter In 4 (VB-Audio Voicemeeter VAIO)
Here’s what it looks like in Windows:
Here’s what it looks like in Discord:
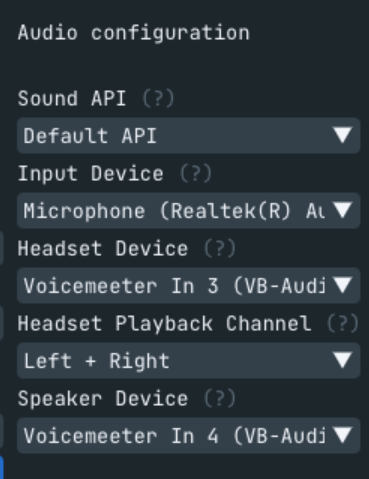
And here’s what TrackAudio should look like:
Step 3: Enable and name virtual inputs in VoiceMeeter
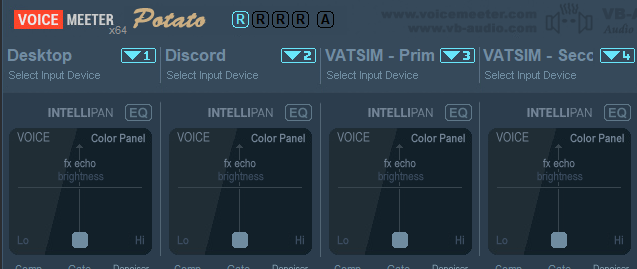
Run VoiceMeeter Potato and click the little down arrows next to each of the first four input devices in the left section of the screen. Then right click on the Stereo Input label for the first four input channels and rename them to match the sources mapped to those inputs:
Input
Name
Input 1
Desktop
Input 2
Discord
Input 3
VATSIM – Primary
Input 4
VATSIM – Secondary
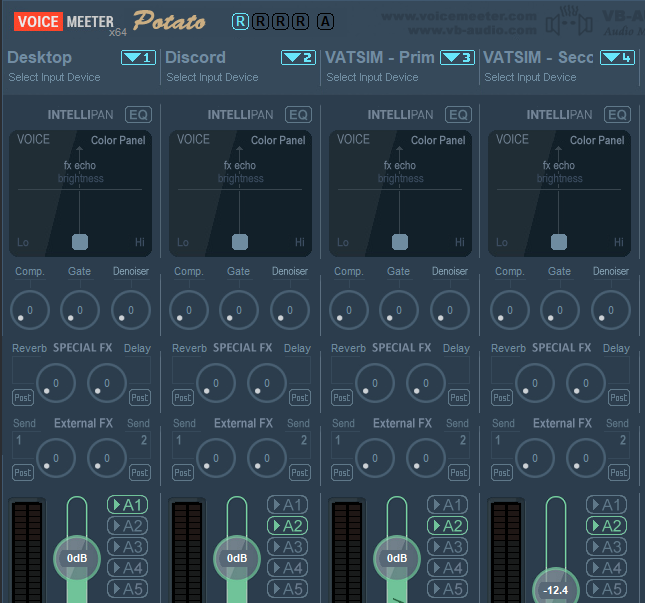
When you are done the input section of VoiceMeeter should look like this:
If you don’t have the little arrows at the top of each input device it means you didn’t license the VAIO Extension as mentioned in step 1.
Step 4: Configure VoiceMeeter outputs
This is where you tell VoiceMeeter to actually output the audio it receives. In my case I have two outputs: my PC speakers and my headset.
In the top right of the VoiceMeeter window select the A1 button and pick your speakers from the WDM (WASAPI) section. Then select the A2 button and pick your headphones from the WDM (WASAPI) section.
If you don’t see separate speaker and headphone devices you may need to run the Realtek audio manager app to set the option that splits the speaker and headphones into two separate devices.
Step 5: Route the audio
At this point you have four different audio inputs and two different audio outputs. The inputs can now easily be routed to the audio output you want by selecting the appropriate output button under each input. In my case I have the desktop audio routed to A1 (speakers) and all the other audio routed to A2 (headphones):
You can use any of the volume or EQ controls to independently modify the audio from each of the input sources. For example, you could put the VATSIM audio entirely in your right ear and the Discord audio in your left ear… but auto-ducking is better, and how to do that will be in the next blog post.
Step 6: Tell TrackAudio where to send each frequency’s audio
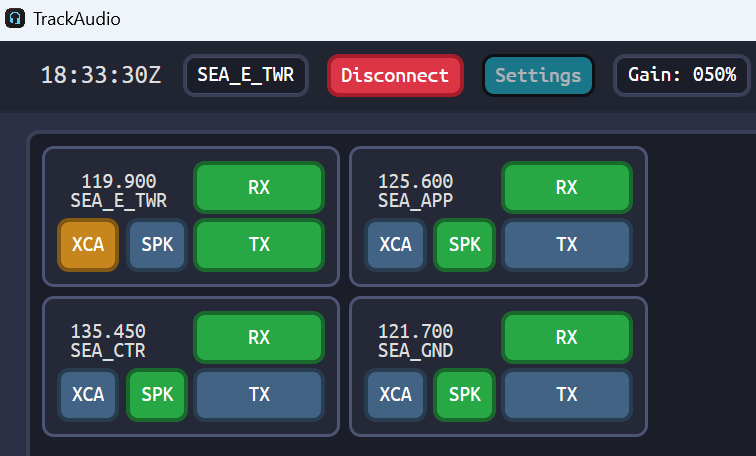
By default, every RX frequency you add in TrackAudio will route to your primary output. To route frequencies to the secondary output you need to click the SPK button on the frequency after you have activated RX. Here’s an example showing SEA_TWR routed to the primary output with SEA_CTR, SEA_APP and SEA_GND routed to the secondary output:
Here’s how I set up model matching for use with VATSIM tower view in MSFS2020. Honestly, it’s the same model matching I use for flying on VATSIM too. It works well.
FSLTL is great for people flying airliners for real airlines. It is not designed for GA aircraft or people flying MSFS default aircraft under non-airline callsigns.
To fix that download the custom rule sets by Marcus Griep. This includes rules for standard, deluxe, and premium MSFS aircraft, as well as common GA aircraft from Carenado, India Foxtrot Echo, and Kitfox. I don’t bother using the rules for Cape Air or the Mega Pack.
Step 3: Get my GA matching supplement rules
I used Model Matching Magic to make an additional rule file that covers some other GA aircraft and tries to at least get *something* to match for certain aircraft types. Download my custom rule set and put it somewhere safe.
Step 4: Add the rules to vpilot
Order matters. The list should be:
FSLTL_Rules.vmr
Carenado_C182.vmr
Carenado_C182_Similar.vmr
Carenado_M20R.vmr
Carenado_M20R_Similar.vmr
IFE_LongEZ.vmr
Kitfox_STi.vmr
MSFS_Premium.vmr
MSFS_Premium_Similar.vmr
MSFS_Deluxe.vmr
MSFS_Deluxe_Similar.vmr
MSFS_Standard.vmr
MSFS_Standard_Similar.vmr
GA_Matching_Supplement.vmr
Step 5: Enjoy!
That’s it. Now you have great model matching for tower view or flying on VATSIM.
If you fly or do ATC on VATSIM chances are you’re also in Discord. You’re either chatting with your friends while flying or having a few laughs with CTR while fixing flight plans working GND.
It’s fun… until someone is talking on Discord and audio comes through on VATSIM. Now you’ve missed your new heading from approach or some poor pilot called for clearance and you have to go “Uhhh, sorry, say again?”
What if you could split the audio so Discord is only in your left headset ear and VATSIM audio was in your right headset ear? Or even better, what if Discord would just automatically mute whenever VATSIM audio happens? Well either one is possible with Voicemeeter Potato, a bizzarely named piece of magical software. This post will show you how to do it.
Make sure to reboot your computer after installing. Yes, you really have to reboot.
VoiceMeeter provides three separate input devices that we’ll use in later steps. One will receive Discord audio, one will receive audio from VATSIM, and the third will handle all other system audio.
Step 2: Configure Discord
Open Discord settings and select Voice & Video. Change the output device to VoiceMeeter Input (VB-Audio VoiceMeeter VAIO):
Step 3: Configure Audio for VATSIM/vPilot/xPilot/etc.
Whatever app generates the audio from VATSIM needs to get updated to use the Voicemeeter Potato output device.
If you’re running Audio For VATSIM select Settings and change the Headset Device to VoiceMeeter AUX Input (VB-Audio VoiceMeeter AUX VAIO):
If you’re running vPilot select Settings then Audio and change the Output Device to VoiceMeeter AUX Input (VB-Audio VoiceMeeter AUX VAIO):
I’ve never used xPilot but I assume its audio settings are similar to vPilot. Regardless of where your VATSIM audio comes from you should change it to use VoiceMeeter AUX Input (VB-Audio VoiceMeeter AUX VAIO) for the output device.
Step 4: Set up the VoiceMeeter Potato basic settings
Run VoiceMeeter Potato. The screen will be large and overwhelming. Don’t panic.
In the top right select the Menu button and pick System tray and Run on Windows Startup:
In the top right third of the screen click on the A1 button and select the WDM output that corresponds to your primary PC speakers. This is the channel all audio except Discord and VATSIM will flow to. In my case it’s my external speakers so A1 looks like this:
Next click on the A2 button and select the WDM output that corresponds to your headset. This is the channel Discord and VATSIM audio will flow to. In my case it’s a second output jack on my PC’s front panel so A2 looks like this:
With the output devices configured the next step is to tell VoiceMeeter what inputs to send to the output devices. In the middle of the VoiceMeeter window are three virtual inputs: VoiceMeeter VAIO (this will be Discord audio), VoiceMeeter AUX (this will be VATSIM audio) and VAIO 3 (this is all other audio). Map them to the appropriate output devices by setting the A1 and A2 buttons for each input appropriately:
At this point you should stop and test that the audio is working correctly. Get in a Discord voice chat and on VATSIM and verify that you are hearing Discord and VATSIM audio through your headset, and all other audio is going through your speakers.
Now for the fun part: splitting audio to different channels or auto-ducking.
Option 1: Split audio to two different headset channels
To put the Discord audio in your left ear and VATSIM audio in your right ear you change the balance of the two input channels by dragging the red dot to the left (for the VAIO input) and to the right (for the AUX input):
Hop on Discord and VATSIM and verify this works.
Option 2: Auto-duck other sources on VATSIM audio transmissions
Instead of splitting audio to two different channels you can use VoiceMeeter to automatically mute all other audio whenever there’s VATSIM audio traffic. This is done with two VoiceMeeter macros.
From the Menu in the top right enable Run MacroButtons on Voicemeeter start:
This should open the MacroButtons window with a single button showing. Resize the window so you have two buttons visible.
Setting up auto-ducking when receiving VATSIM audio
Right click on the first button and configure it as follows:
strip(6) is a reference to the Voicemeeter AUX virtual input that receives VATSIM audio. The trigger at the bottom also references the Voicemeeter AUX input (even though it says in #7. Yes, it is confusing.) Whenever audio is detected on that input channel the macro will fire and put the AUX input in solo mode, muting all other system audio. When the audio stops the macro will wait 500ms and then re-enable all the other audio channels.
You can use the red and green arrow to fine-tune the audio level required to trigger the start and stop action.
Setting up auto-ducking when transmitting on VATSIM
This step assumes you have a keyboard push to talk key configured for VATSIM audio.
Right click on the second macro button and configure it as follows:
Change the Keyboard Shortcut setting to match the keyboard key you push to talk on VATSIM.
It is possible to do it via a HID device button as well (such as a joystick), however I haven’t done that and don’t know how the HID Device Button section works. See the VoiceMeeter manual for more info if you want to use a joystick button instead.
That’s it! Hop on Discord and VATSIM and verify this works. All system audio should mute whenever you receive or send VATSIM audio then unmute when the transmission is done.
Other variations
Don’t want to mute *all* audio when VATSIM audio happens and just want to mute Discord? Change the macros to do strip(5).mute = 1 and strip(5).mute = 0 for the on and off requests respectively. strip(5) references the Voicemeeter VAIO virtual input and mutes/unmutes just that channel.
Don’t want to completely mute Discord audio? Use strip(5).fadeto = (-15.0, 100); and strip(5).fadeto = (0.0, 200); for a subtle fade in and out.
Don’t want to completely mute system audio but still want to mute Discord audio? Combine the two approaches to mute Discord and fade system audio:
strip(5).mute = 1
strip(7).fadeto = (-15.0, 100);
then unmute and unfade:
strip(5).mute = 0
strip(7).fadeto = (0, 200);
strip(7) references the VAIO 3 virtual input which is carrying all other system audio.
Many more options are available, basically whatever you can control via the VoiceMeeter UI you can also set via macros. See the VoiceMeeter user manual for all the details.