(This is the first in a series of re-posts of trip notes I took on my 2009 photography trip to Antarctica)
Those of you looking for high excitement will want to look somewhere other than today’s report. Starting with a 4:30am wakeup the entire day consisted of planes, waiting areas, and more planes.
Shan drove me to the airport for my 7:20am flight. Unlike when we tried to go home for Christmas there was no snow. Yay! Security was a breeze, and they hand-scanned my film with no questions. While I was waiting for that I saw someone have an entire unopened bottle Asian hot sauce confiscated. Why on earth would you take that as carry-on? Oh, and my checked bag weighed in at… 49lbs! Woot!
The flight from Seattle to Atlanta had Delta’s fancy in-seat entertainment system which was actually pretty cool. They had 18 channels of live Dish TV, a 3000 song music library (mostly albums from their onboarding music at), and a trivia game! I played against others on the flight and won one game and lost two.
During the safety video Deltalina wagged her finger at me. I almost fainted from excitement. Oh, and good thing I had my sunglasses on for the tooth glint.
After flying small Air Canada Jazz jets for Christmas the 767 from Seattle to Atlanta was HUGE. The wings went on forever!
This post describes a LOT of gear. Photography isn’t just cameras and lenses, there’s a ton of other, ah, stuff that has to come along to make a shoot work well. All those odds and ends? Here they are!
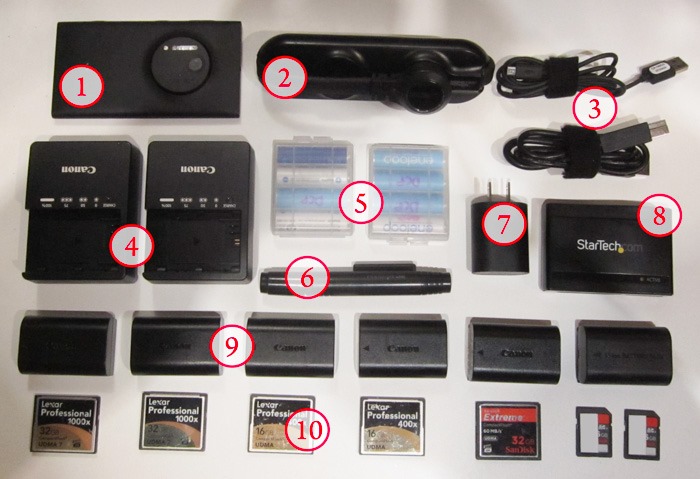
1. Nokia Lumia 1020. This is my portable camera and GPS for the trip.
2. Monster Outlets To Go 4 Outlet Travel Power Strip. Before y’all go hating me for owning a product from Monster hear me out. This only costs $10 and is so small you can slip it into any bag and never know it’s there until you find all the receptacles in a room are full. Whip this little guy out, plug it in, and voila. Plenty of places to charge up.
3. USB cables. Two of three that come on the trip, since I need a USB A-Micro, USB A-B, and USB 3.0 cable. Sigh.
4. Canon battery chargers. Two of them since I have just a few batteries along for the trip.
5. Enloop AA batteries. Eight backups, to go along with the 10 that are installed in the flashes (more on the flashes later).
6. Lenspen. In case I get schmutz on my lens.
7. Nokia Lumia 1020 charging plug.
8. StarTech.com USB 3.0 card reader. When Windows 8 first came out this is the only USB 3.0 card reader I had reliable success with.
9. Canon batteries. Six of ‘em for three cameras.
10. Storage. Three 32GB CF cards, two 16GB CF cards, and a couple of 8GB SD cards just in case. These will get dumped after every shoot to the laptop and backup drive, and then formatted.
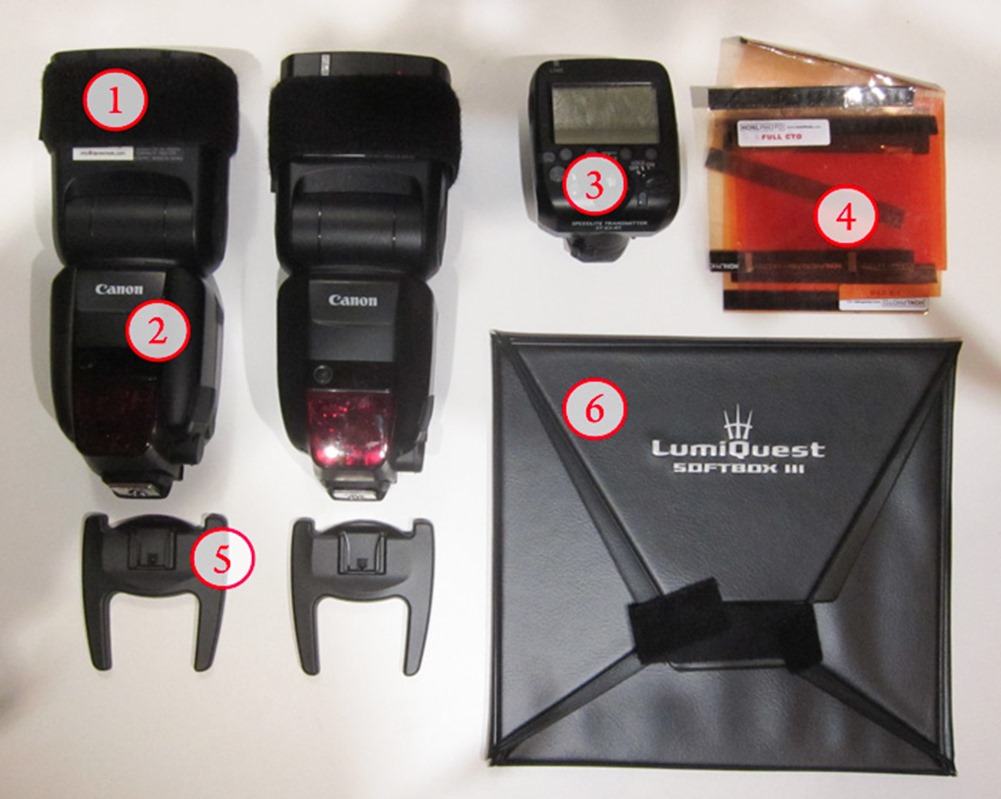
1. Honl Speed Strap. One on each flash to attach either gels (4) or the softbox (6).
2. Canon 600EX-RT flashes. Two of them. These suckers are expensive but are worth every penny. The wireless radio feature is fantastic.
3. Canon ST-E3-RT transmitter. Without this the wireless feature of the 600EX-RT flashes wouldn’t do much.
4. Honl CTO gels. I rarely use these but they take up no space in the bag so I always keep them around for when I need a splash of orange. Don’t panic about the full CTO! I have some 1/4 CTOs at the bottom of the pile.
5. Flash feet. They come with the flashes and take up no space in the bag. They’re kinda handy on occasion, to be honest.
6. LumiQuest Softbox III. I’ve used this, uh, never. But it fits perfectly in my bag so I always carry it. Someday I’ll learn how to use it properly.
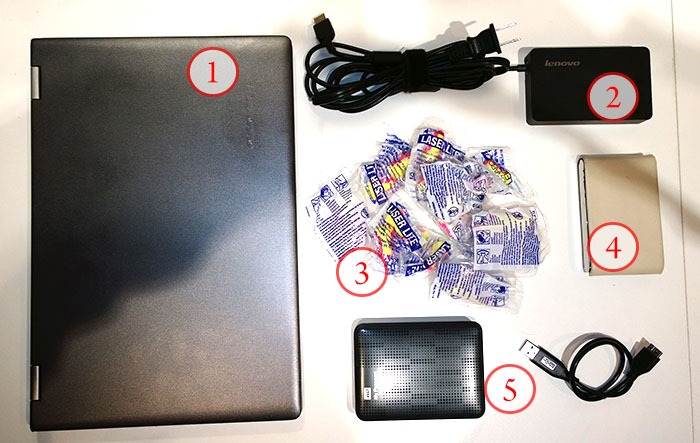
1. Lenovo Yoga 13” Laptop. My travel workhorse for image editing. Running Windows 8.1 with a dedicated internal 256GB SSD for images, Photo Mechanic, Lightroom, Photoshop, and Nik Silver Efex Pro and Nik Color Efex Pro. I love this laptop.
2. Power cord for the laptop. Very important!
3. Earplugs. Also very important when shooting sporting events.
4. Business cards. I get mine from moo.com.
5. WD Passport 1TB USB 3.0 drive. This is my travel drive that I can lose with no issue. It contains all the Seattle Storm photos I’ve shot in the last three years as well as my landscape work for the last 3 years. But not the only copy. Just a travel copy. It will also serve as my backup device to ensure I have a second copy of my photos during the week. This drive does not travel in my camera bag. It stays in an independent bag from my laptop, just in case I forget the bag with the laptop somewhere.
Not pictured in the above photos are three other important pieces of gear for the trip:
1. Black Rapid Double-Strap. This is how I carry two bodies with me when I’m shooting sports. I love it. Love love love it.
2. Gitzo GM2940 monopod. For supporting a long lens during football games. At least, that’s what I’m told it’s used for. I’ve never used it for that, and only used it once at a basketball game before I gave up since it’s so unwieldy.
3. Really Right Stuff BH-25 PRO ballhead. How I attach the camera/lens to the monopod. It may be small but it is sturdy and can easily handle the 5D Mk III/300mm combo.
All the grip stuff is fun but without cameras and lenses you can’t really take any photos. Here’s what’s coming to Atlanta to actually take pictures.
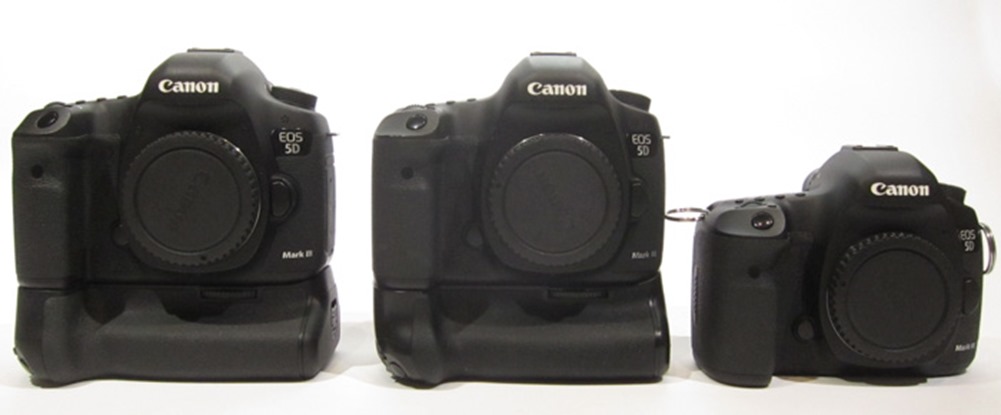
The bodies are easy: three Canon 5D Mk IIIs. Two have vertical grips (one from Canon, the other some generic knock-off brand). Both vertical grips have the all-important AF point 9-way controller so I can quickly change AF points when holding the cameras vertically.
The third body has earrings. They’re split-rings mounted to the camera strap connections so I have somewhere to attach a safety cable.
Why three bodies? For basketball I’ll typically run two with me physically, one with a long lens and one with a wide lens, and then the third as a remote camera somewhere. I’ve never shot football before but from what I’ve read I’ll have all three on my person for that. Yikes!
I’m honestly not sure how much I’ll use the vertical grips. I just started using them for this Storm season and am still figuring out if they’re worth lugging around.
Here’s the lens lineup:
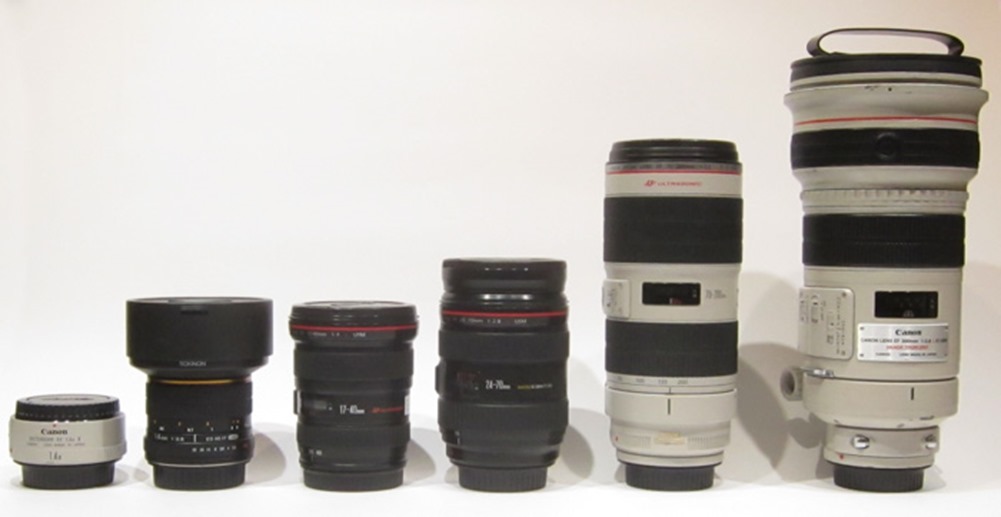
From left to right:
- Canon EF 1.4x extender
- Rokinon 14mm
- Canon 17-40 f/4.0L
- Canon 24-70 f/2.8L
- Canon 70-200 f/2.8L IS II
- Canon 300mm f/2.8 IS
I’m also bringing lens hoods for all the Canon lenses.
My workhorse lenses for shooting basketball are the three on the right. The 17-40 is what I typically use behind the glass on a remote camera. The 14mm is coming along for fun. The 1.4x is along for football to give me some extra reach on the 300mm.
All of the bodies and every lens (with hood!) except the 300mm fit in my Think Tank Airport Navigator. It’s a crazy, crazy, bag!
Honestly, I’m mostly interested in writing about what I learn during the workshop, but I know people are always interested in gear so I’m going to do a series of posts before I even get on the plane to get the gear stuff out of the way.
First up: the grip bag. You’d be surprised at how much non-camera gear comes along for a sports shoot!
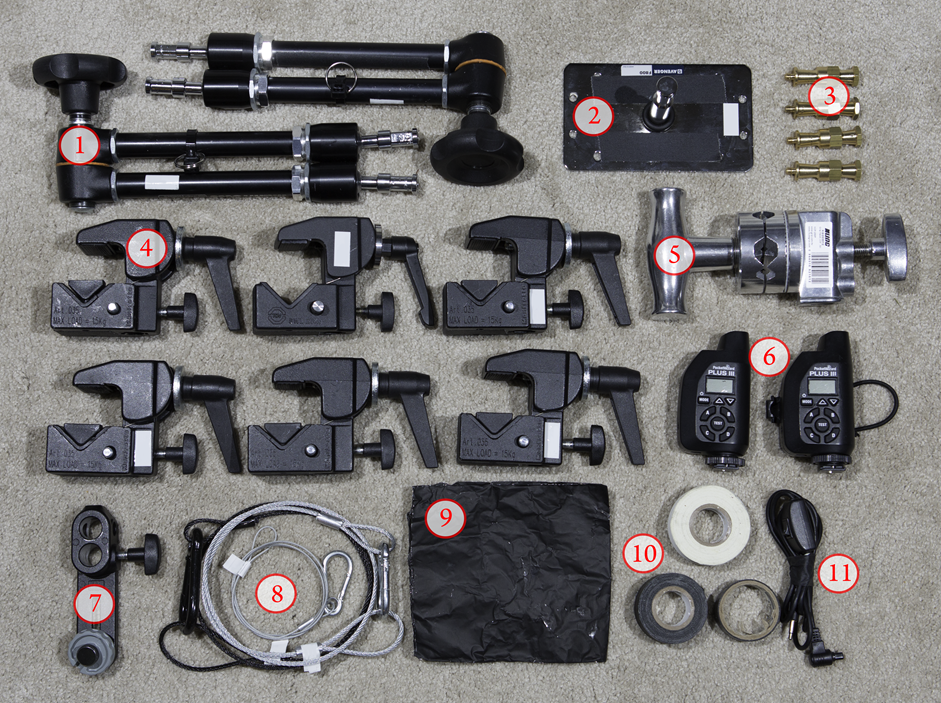
1. Manfrotto 244N Variable Friction Magic Arm. Two of these are the core component of the grip bag. They’ll allow me to hang my camera in random places to get a different view of the action. Each arm is modified with a 110lb. strength zip tie and split ring to give me a place to attach a safety cable.
2. Avenger F800 3-Inch Baby Wall Plate. Combined with #3, #5, and #7 I can set up a stable remote camera on the ground.
3. Manfrotto 1/4” Standard Stud. These are the generic studs that come with the clamps. I rarely use them but they take up almost no space in the bag so I carry them with me.
4. Kupo Convi Clamp. These attach the Magic Arms to just about anything, and if you don’t have them the Magic Arms are useless. I have a mix of Kupo and Manfrotto brands. The advantage of the Kupos is they’re cheaper!
5. Kupo 2.5” Grip Head With Big Handle. I stole this off my c-stand to use with the baby wall plate for a floor camera. It’s kinda bulky, to be honest, and I wish I had something different to use. But I don’t, so it comes along. I’m sure I’ll find out about a better option than this at the workshop.
6. Pocket Wizard Plus III Transceivers. Two of these are required for them to be useful. This is how I trigger the remote camera that’s mounted somewhere out of my reach. One of the receivers is attached to a FlashZebra Caddy v3 which makes it really easy to attach the Pocket Wizard to the Magic Arm.
7. Manfrotto 143BKT Camera Bracket. This is how I attach the camera to the Magic Arm.
8. Safety cables. There’s only three in this picture but don’t worry. I’m buying more before the trip. You can never have enough and somehow I keep misplacing them. These are critical when mounting a camera in the air somewhere. My most recent set are from Amazon, and include the Chauvet 3-pack, which are lighter duty but fine for smaller gear, and the heftier 29″ unnamed cables.
9. Cinefoil. I use this to kill reflections when mounting the camera behind glass.
10. Tape. I carry a white and black roll of microGAFFER tape and a small roll of black electrical tape. The electrical tape is a good way to attach cinefoil to a backboard camera without showing white adhesive to the players.
11. FlashZebra Shutter Cable. This runs from the Pocket Wizard to the camera to actually fire the shutter. You can buy an official one from Pocket Wizard or get a cheap knock-off, which is what I did. Mine has a pre-release switch on it to ensure quick shutter release when the action heats up.
All of this packs into a small tool bag from Home Depot. I’m not wild about the bag, to be honest, and am still on the hunt for something that works better. Haven’t found anything yet.
Note: If you purchase something by following the links above I may get a tiny commission from Amazon. I have personally purchased and paid for all the items mentioned in this blog post.
I’m fortunate that I’m in Moab during February, where sunrise isn’t until 7am. That means (only!) a 5:30am departure every morning. Ugh.
As you can imagine naptime is thus very important.
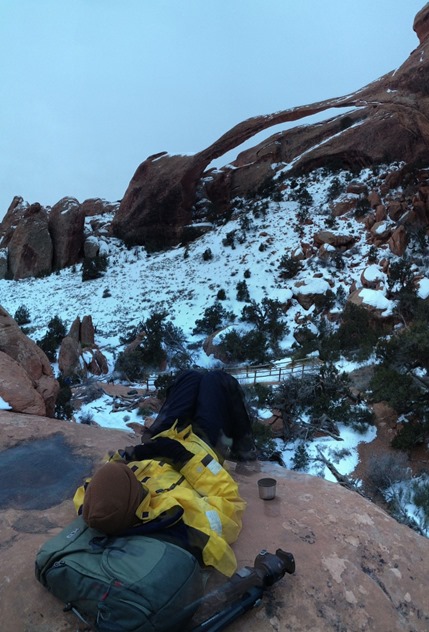
Naptime at Landscape Arch in Arches National Park, UT, on Saturday, Feb. 23, 2013. Photo courtesy Brett Edge.
I’ve been in the Moab, UT, area for the last week on a workshop with Andy Biggs and Bret Edge. It’s been an interesting run of moody skies with lots of clouds, but no real sunrises or sunsets to speak of. Looking at my selects for the week they’re almost all in black and white: a sure sign we haven’t had much luck with golden light.
Tonight looked to be the same. It was snowing like crazy when we left Moab for Arches National Park. During our first stop I just took photos of everyone standing around in the snow talking about funny Internet videos.
We moved to Skyline Arch for our last stop of the evening. It had stopped snowing but the sky was completely grey. Here’s what things looked like at 5:15:31 PM, facing roughly east:
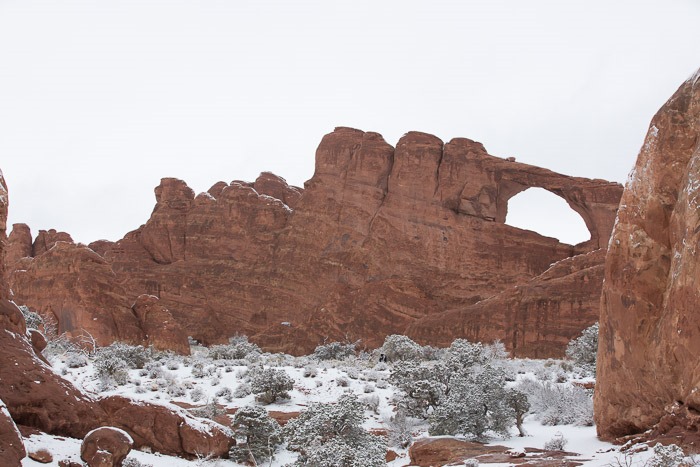
Yuck. For reference, here’s the sky to the west at 5:30:19 PM:
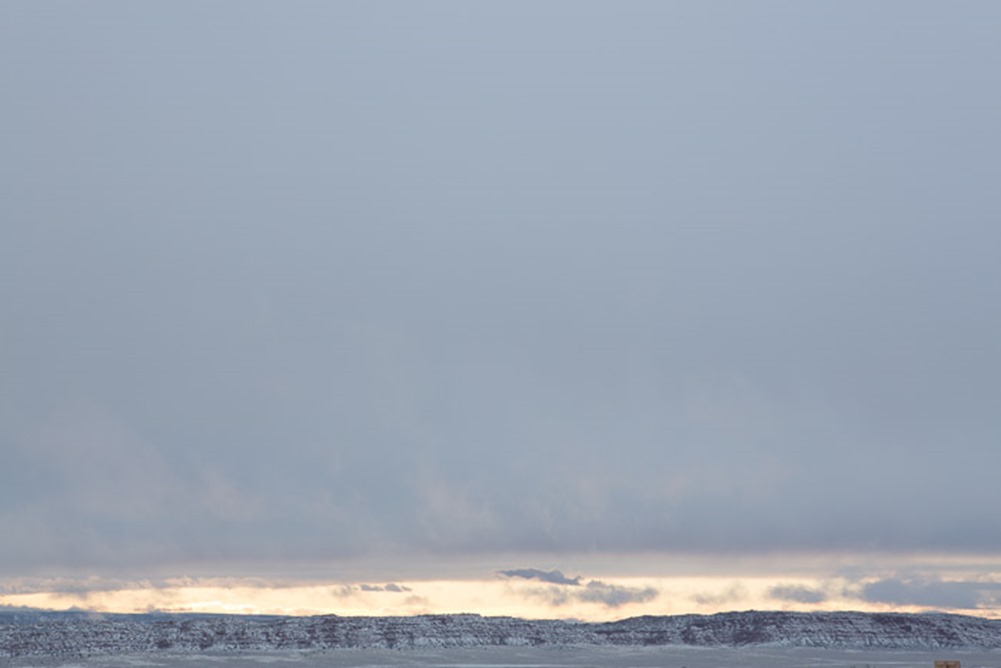
Yuck. But see that little band of light? That little band of light caused six minutes of total insanity:
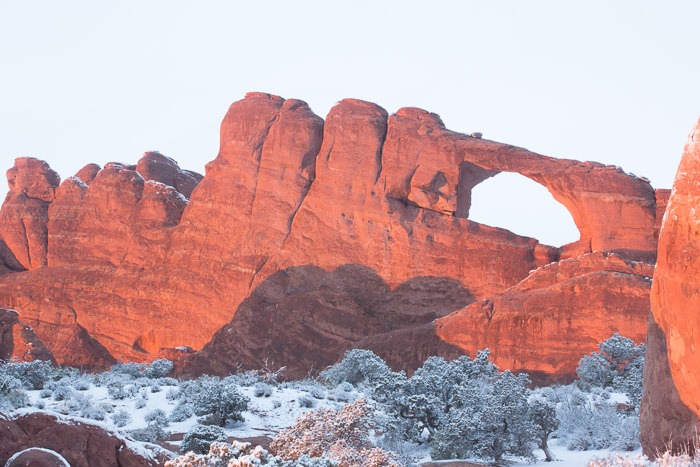
5:56:21 PM: The light arrives.
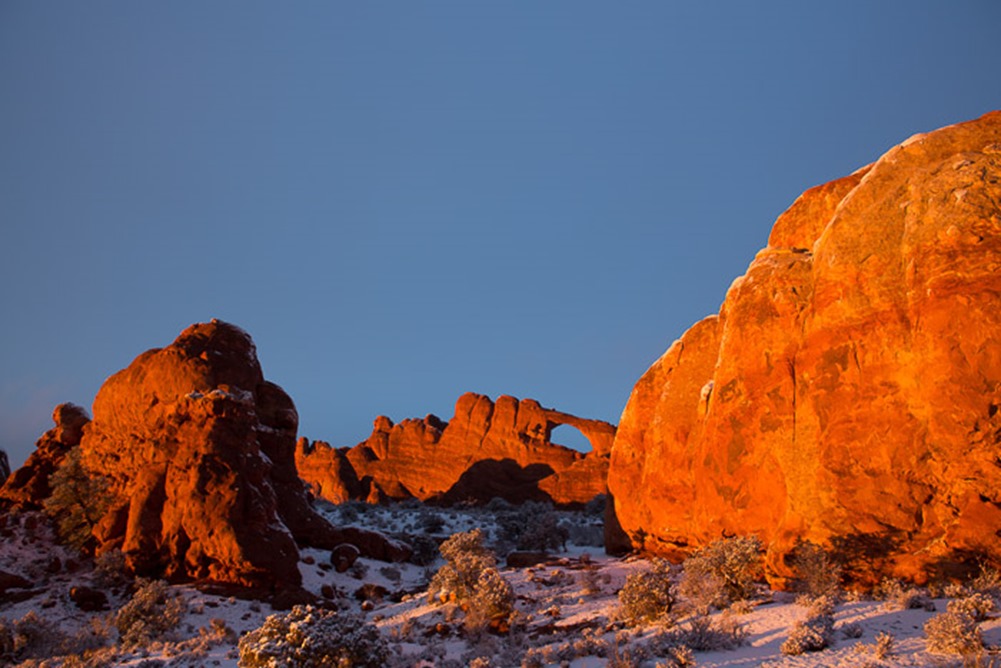
5:59:25 PM: BOOM!
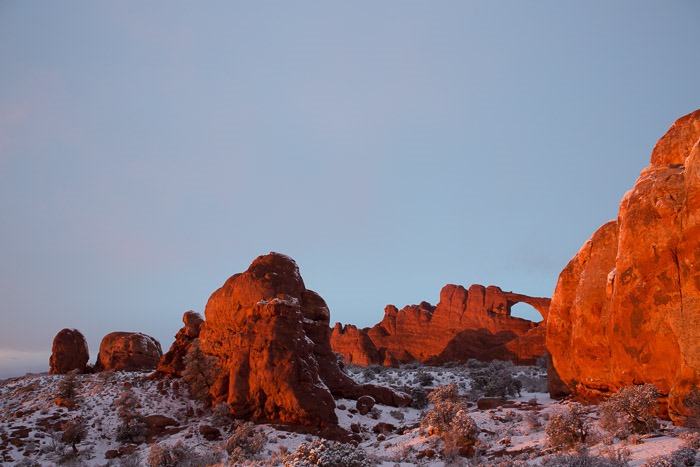
6:02:34 PM: It’s over.
I have never moved so fast when shooting. Ever. I had the wrong lens on the camera when the light hit (I was facing west, looking at the cloud band) and seriously considered throwing my 70-200 lens into the snow just to get it off the camera so I could mount the 24-70 before the light went away. At one point I was holding the 70-200 by its tripod foot in my teeth. Somehow I managed to get things wired up and took not one but two portfolio-worthy photos:
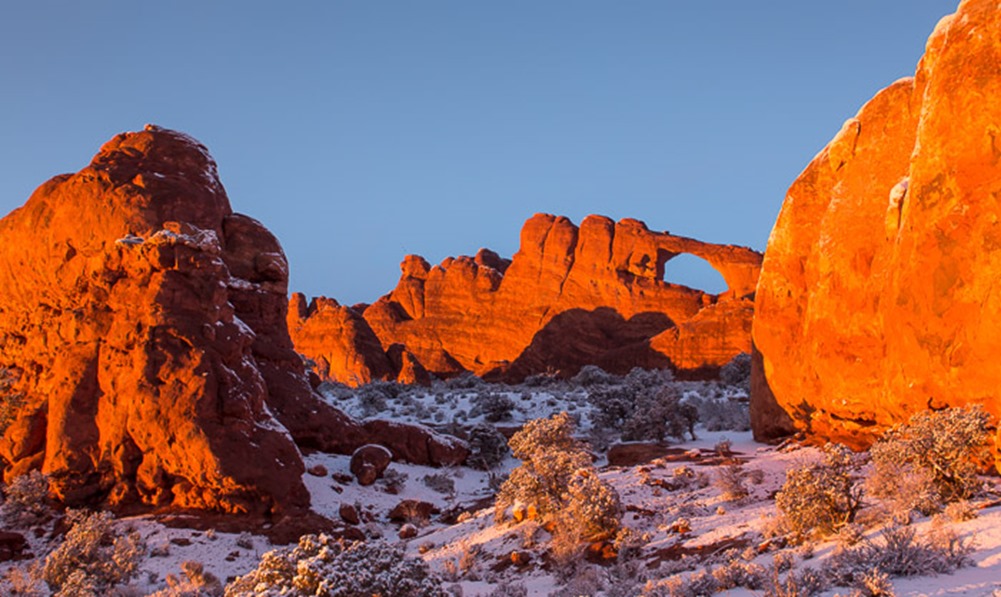
Golden light washes over Skyline Arch in Arches National Park, UT, at sunset on Saturday, Feb. 23, 2013. (Photo/Neil Enns)
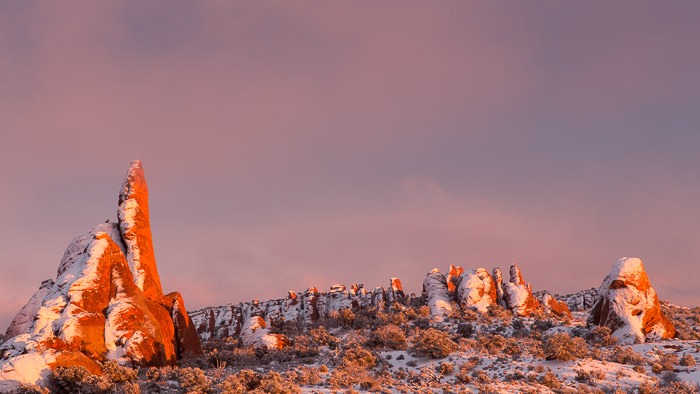
Sunset light washes over rock fins in Arches National Park, UT, on Saturday, Feb. 23, 2013. (Photo/Neil Enns)
The fins shot was taken at 6:01:39 PM, less than a minute before the sun slipped behind the far mountain range and all the side lighting was gone.
I got very, very, lucky.
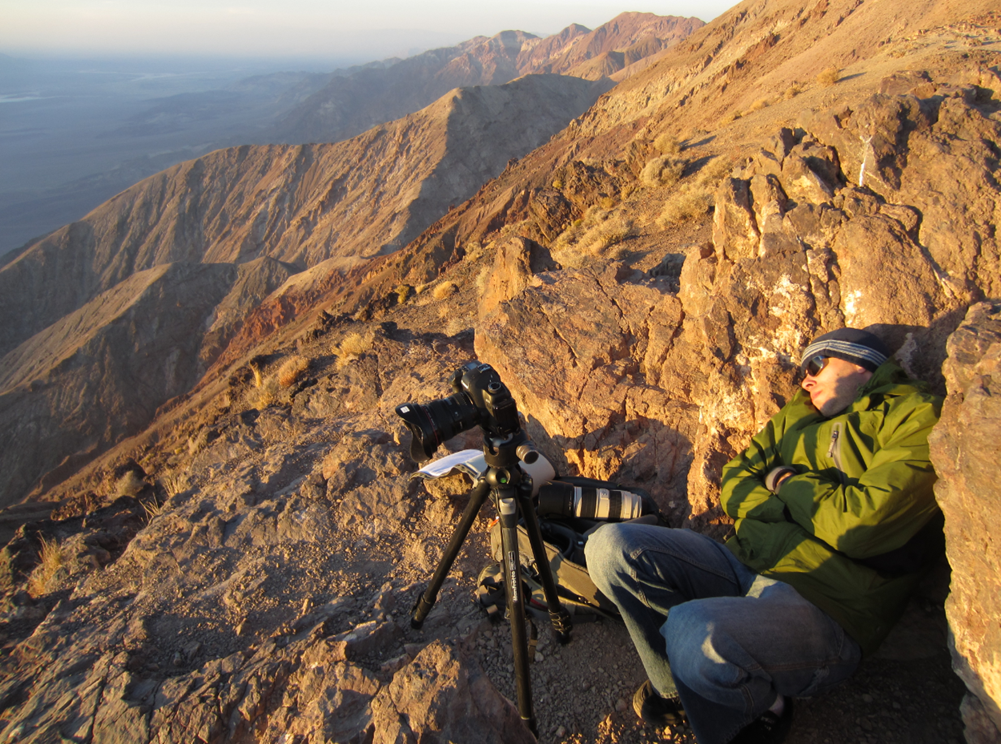
Since this is the 7th post in my series on the importance of nap time it should come as no surprise that I believe in naps on photo trips. This time, I’m napping at Dante’s View in Death Valley National Park.
I honestly can’t remember what the real name for this assignment was but it was similar to the picture package project from assignment 4. We had write up a short project description, submit it for approval, work with a partner (Tory Watson) as a photo editor, and submit a final package of 10-15 images. Thankfully we had a couple of weeks to work on this!
My original plan was to do a package of photos that showed the impact of transportation on the Puget Sound region. After the first class discussion where we all shared our projects it was clear I needed to scope my project back a bit to ensure success.
Once again my social network saved me: turns out a co-worker used to work with one of the public relations people at SoundTransit! After an introduction I arranged to visit their maintenance facility and decided to focus the project on the people that keep the Sound Transit trains running.
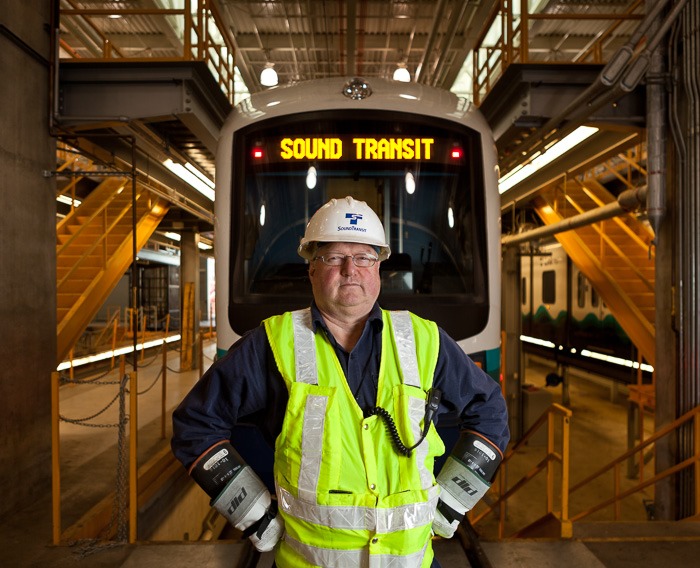
Electromechanic Stephen Lee stands in front of one of the trains maintains at the service facility in Seattle, WA on Tuesday, March 6, 2012. Lee, a proud Cherkoee, has worked at SoundTransit since it started operating 3 years ago. (Photo/Neil Enns)
The people at SoundTransit were incredibly gracious and accommodating. They willingly explained everything going on, posed, uncovered things, and generally gave me amazing access to the people and equipment in the facility. The only problem? I came away with absolute crap photos on my first visit. After doing an edit pass on the photos I had enough to submit in a pinch, but not enough that I was actually happy with the result. UGH!
Did I mention the Sound Transit folks were incredibly accommodating? I asked if I could come for a second visit to help finish up the image set and they welcomed me back. Did I mention how good it was to have two weeks to complete this assignment?
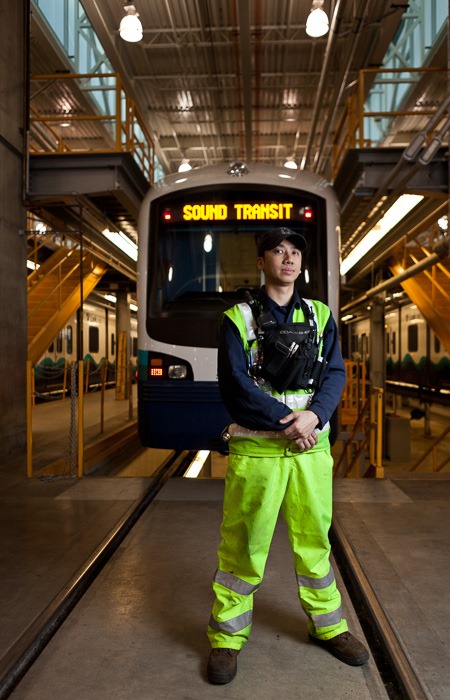
Electromechanic Calvin Lee stands in front of one of the trains maintains at the service facility in Seattle, WA on Tuesday, March 6, 2012. Lee has worked at SoundTransit since it started operating 3 years ago. (Photo/Neil Enns)
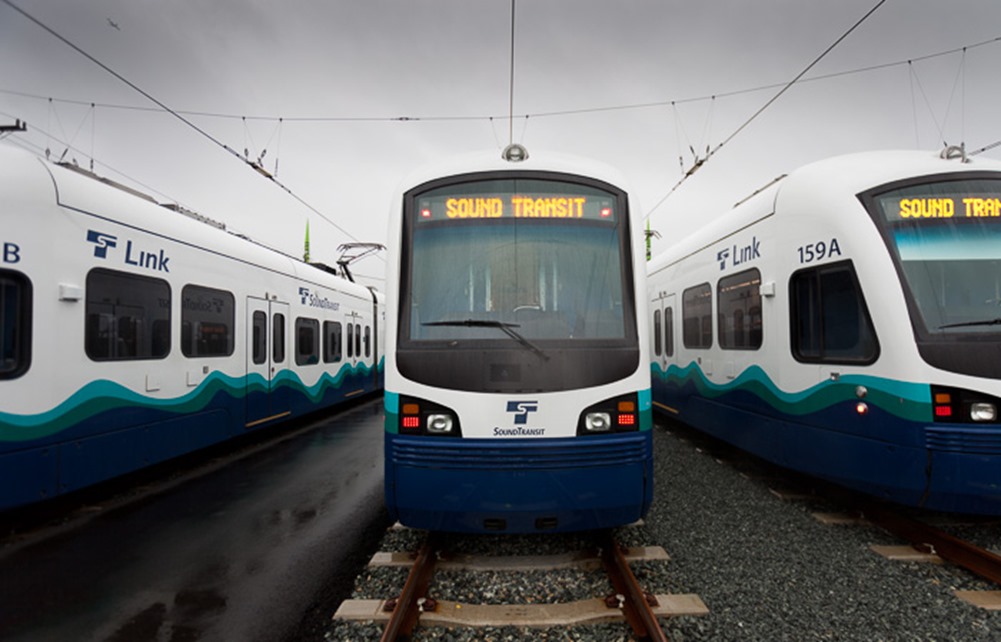
SoundTransit trains sit in the rail yard at the maintenance facility in Seattle on Friday, Feb. 17, 2012.
In the end I wound up submitting 11 photos. Looking back at them a year later I can’t help but feel like it was a missed assignment. The photos are good but not great. The portraits in particular could have been so much better. Ah well, something to keep working on improving!
Wow, I’m way behind in finishing this series. It’s been almost a year since my last post about this class. Ah well, better late than never.
For assignment 6 we had to produce one image. We had a choice: we could either submit a photo that spoke to homelessness in Seattle, or we could do a photo on the rise of urban farming. I wimped out and went the urban farming route.
This assignment (and the next) were good reminders of how important a wide network of contacts is when you’re doing editorial photography. I happened to know a family from the curling club that had backyard chickens and asked if I could swing by for a photo session. It was a pretty dreary day but chickens, rabbits, an almost-teen, and garden were perfect to show urban farming. We hung out in the backyard for about 30 minutes chasing chickens, feeding chickens, and generally having fun. Most of the photos were just ok, but the minute I snapped this portrait I knew the assignment was done:
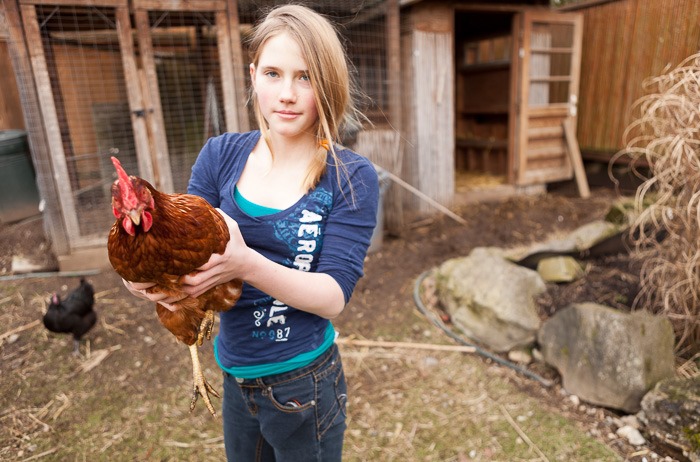
Holding a gold sex link chicken, Emma Pirie, 12, stands in front of the family chicken coop in her backyard urban farm in Shoreline, WA, on Sunday, Feb. 26, 2012. The Pirie family farm includes nine chickens and eight rabbits, as well as a large garden. (Photo/Neil Enns)
The cellphone sticking out of Emma’s pocket was a happy accident I didn’t even notice until someone pointed it out in class.
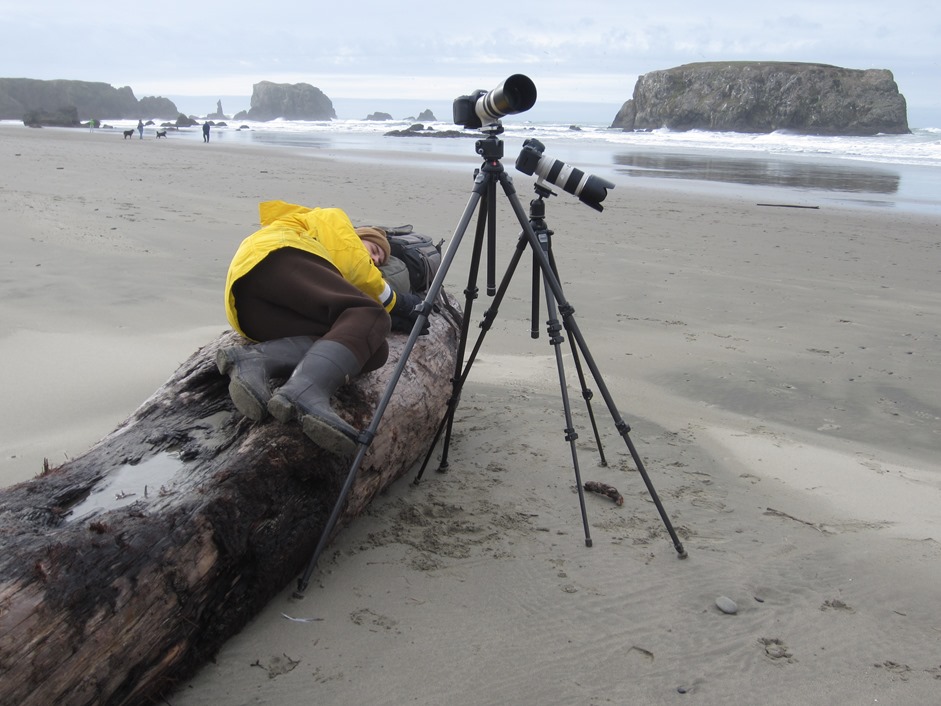
It’s always time for nap time! This time on the beach at Bandon, OR, waiting for a sunset that never materialized. Photo courtesy of Shan Vincent.


