This post describes a LOT of gear. Photography isn’t just cameras and lenses, there’s a ton of other, ah, stuff that has to come along to make a shoot work well. All those odds and ends? Here they are!
1. Nokia Lumia 1020. This is my portable camera and GPS for the trip.
2. Monster Outlets To Go 4 Outlet Travel Power Strip. Before y’all go hating me for owning a product from Monster hear me out. This only costs $10 and is so small you can slip it into any bag and never know it’s there until you find all the receptacles in a room are full. Whip this little guy out, plug it in, and voila. Plenty of places to charge up.
3. USB cables. Two of three that come on the trip, since I need a USB A-Micro, USB A-B, and USB 3.0 cable. Sigh.
4. Canon battery chargers. Two of them since I have just a few batteries along for the trip.
5. Enloop AA batteries. Eight backups, to go along with the 10 that are installed in the flashes (more on the flashes later).
8. StarTech.com USB 3.0 card reader. When Windows 8 first came out this is the only USB 3.0 card reader I had reliable success with.
9. Canon batteries. Six of ‘em for three cameras.
10. Storage. Three 32GB CF cards, two 16GB CF cards, and a couple of 8GB SD cards just in case. These will get dumped after every shoot to the laptop and backup drive, and then formatted.
1. Honl Speed Strap. One on each flash to attach either gels (4) or the softbox (6).
2. Canon 600EX-RT flashes. Two of them. These suckers are expensive but are worth every penny. The wireless radio feature is fantastic.
3. Canon ST-E3-RT transmitter. Without this the wireless feature of the 600EX-RT flashes wouldn’t do much.
4. Honl CTO gels. I rarely use these but they take up no space in the bag so I always keep them around for when I need a splash of orange. Don’t panic about the full CTO! I have some 1/4 CTOs at the bottom of the pile.
5. Flash feet. They come with the flashes and take up no space in the bag. They’re kinda handy on occasion, to be honest.
6. LumiQuest Softbox III. I’ve used this, uh, never. But it fits perfectly in my bag so I always carry it. Someday I’ll learn how to use it properly.
1. Lenovo Yoga 13” Laptop. My travel workhorse for image editing. Running Windows 8.1 with a dedicated internal 256GB SSD for images, Photo Mechanic, Lightroom, Photoshop, and Nik Silver Efex Pro and Nik Color Efex Pro. I love this laptop.
2. Power cord for the laptop. Very important!
3. Earplugs. Also very important when shooting sporting events.
5. WD Passport 1TB USB 3.0 drive. This is my travel drive that I can lose with no issue. It contains all the Seattle Storm photos I’ve shot in the last three years as well as my landscape work for the last 3 years. But not the only copy. Just a travel copy. It will also serve as my backup device to ensure I have a second copy of my photos during the week. This drive does not travel in my camera bag. It stays in an independent bag from my laptop, just in case I forget the bag with the laptop somewhere.
Not pictured in the above photos are three other important pieces of gear for the trip:
1. Black Rapid Double-Strap. This is how I carry two bodies with me when I’m shooting sports. I love it. Love love love it.
2. Gitzo GM2940 monopod. For supporting a long lens during football games. At least, that’s what I’m told it’s used for. I’ve never used it for that, and only used it once at a basketball game before I gave up since it’s so unwieldy.
3. Really Right Stuff BH-25 PRO ballhead. How I attach the camera/lens to the monopod. It may be small but it is sturdy and can easily handle the 5D Mk III/300mm combo.
All the grip stuff is fun but without cameras and lenses you can’t really take any photos. Here’s what’s coming to Atlanta to actually take pictures.
The bodies are easy: three Canon 5D Mk IIIs. Two have vertical grips (one from Canon, the other some generic knock-off brand). Both vertical grips have the all-important AF point 9-way controller so I can quickly change AF points when holding the cameras vertically.
The third body has earrings. They’re split-rings mounted to the camera strap connections so I have somewhere to attach a safety cable.
Why three bodies? For basketball I’ll typically run two with me physically, one with a long lens and one with a wide lens, and then the third as a remote camera somewhere. I’ve never shot football before but from what I’ve read I’ll have all three on my person for that. Yikes!
I’m honestly not sure how much I’ll use the vertical grips. I just started using them for this Storm season and am still figuring out if they’re worth lugging around.
Here’s the lens lineup:
From left to right:
Canon EF 1.4x extender
Rokinon 14mm
Canon 17-40 f/4.0L
Canon 24-70 f/2.8L
Canon 70-200 f/2.8L IS II
Canon 300mm f/2.8 IS
I’m also bringing lens hoods for all the Canon lenses.
My workhorse lenses for shooting basketball are the three on the right. The 17-40 is what I typically use behind the glass on a remote camera. The 14mm is coming along for fun. The 1.4x is along for football to give me some extra reach on the 300mm.
All of the bodies and every lens (with hood!) except the 300mm fit in my Think Tank Airport Navigator. It’s a crazy, crazy, bag!
Honestly, I’m mostly interested in writing about what I learn during the workshop, but I know people are always interested in gear so I’m going to do a series of posts before I even get on the plane to get the gear stuff out of the way.
First up: the grip bag. You’d be surprised at how much non-camera gear comes along for a sports shoot!
1. Manfrotto 244N Variable Friction Magic Arm. Two of these are the core component of the grip bag. They’ll allow me to hang my camera in random places to get a different view of the action. Each arm is modified with a 110lb. strength zip tie and split ring to give me a place to attach a safety cable.
3. Manfrotto 1/4” Standard Stud. These are the generic studs that come with the clamps. I rarely use them but they take up almost no space in the bag so I carry them with me.
4. Kupo Convi Clamp. These attach the Magic Arms to just about anything, and if you don’t have them the Magic Arms are useless. I have a mix of Kupo and Manfrotto brands. The advantage of the Kupos is they’re cheaper!
5. Kupo 2.5” Grip Head With Big Handle. I stole this off my c-stand to use with the baby wall plate for a floor camera. It’s kinda bulky, to be honest, and I wish I had something different to use. But I don’t, so it comes along. I’m sure I’ll find out about a better option than this at the workshop.
6. Pocket Wizard Plus III Transceivers. Two of these are required for them to be useful. This is how I trigger the remote camera that’s mounted somewhere out of my reach. One of the receivers is attached to a FlashZebra Caddy v3 which makes it really easy to attach the Pocket Wizard to the Magic Arm.
8. Safety cables. There’s only three in this picture but don’t worry. I’m buying more before the trip. You can never have enough and somehow I keep misplacing them. These are critical when mounting a camera in the air somewhere. My most recent set are from Amazon, and include the Chauvet 3-pack, which are lighter duty but fine for smaller gear, and the heftier 29″ unnamed cables.
9. Cinefoil. I use this to kill reflections when mounting the camera behind glass.
10. Tape. I carry a white and black roll of microGAFFER tape and a small roll of black electrical tape. The electrical tape is a good way to attach cinefoil to a backboard camera without showing white adhesive to the players.
11. FlashZebra Shutter Cable. This runs from the Pocket Wizard to the camera to actually fire the shutter. You can buy an official one from Pocket Wizard or get a cheap knock-off, which is what I did. Mine has a pre-release switch on it to ensure quick shutter release when the action heats up.
All of this packs into a small tool bag from Home Depot. I’m not wild about the bag, to be honest, and am still on the hunt for something that works better. Haven’t found anything yet.
Note: If you purchase something by following the links above I may get a tiny commission from Amazon. I have personally purchased and paid for all the items mentioned in this blog post.
I’ve been in the Moab, UT, area for the last week on a workshop with Andy Biggs and Bret Edge. It’s been an interesting run of moody skies with lots of clouds, but no real sunrises or sunsets to speak of. Looking at my selects for the week they’re almost all in black and white: a sure sign we haven’t had much luck with golden light.
Tonight looked to be the same. It was snowing like crazy when we left Moab for Arches National Park. During our first stop I just took photos of everyone standing around in the snow talking about funny Internet videos.
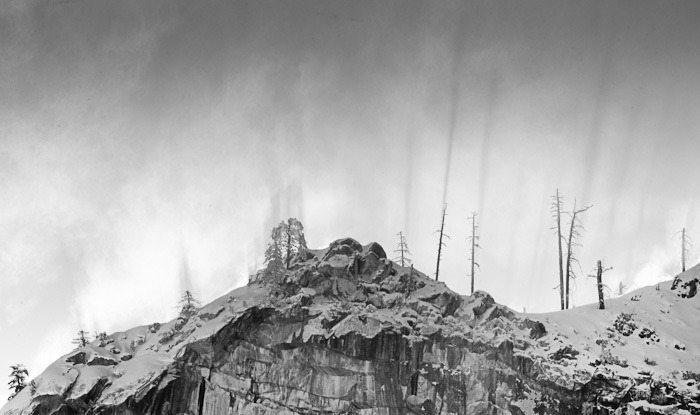
We moved to Skyline Arch for our last stop of the evening. It had stopped snowing but the sky was completely grey. Here’s what things looked like at 5:15:31 PM, facing roughly east:
Yuck. For reference, here’s the sky to the west at 5:30:19 PM:
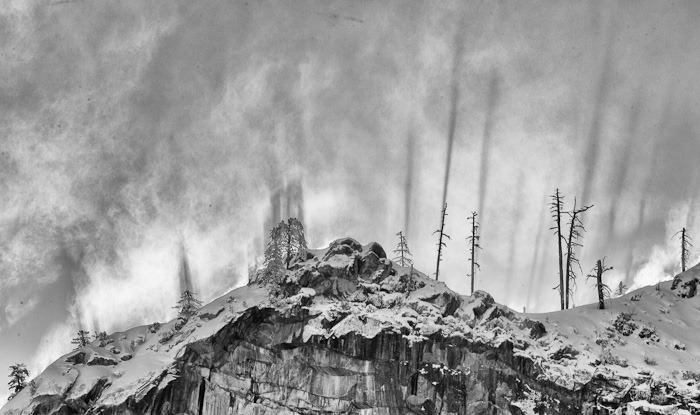
Yuck. But see that little band of light? That little band of light caused six minutes of total insanity:
5:56:21 PM: The light arrives.
5:59:25 PM: BOOM!
6:02:34 PM: It’s over.
I have never moved so fast when shooting. Ever. I had the wrong lens on the camera when the light hit (I was facing west, looking at the cloud band) and seriously considered throwing my 70-200 lens into the snow just to get it off the camera so I could mount the 24-70 before the light went away. At one point I was holding the 70-200 by its tripod foot in my teeth. Somehow I managed to get things wired up and took not one but two portfolio-worthy photos:
Golden light washes over Skyline Arch in Arches National Park, UT, at sunset on Saturday, Feb. 23, 2013. (Photo/Neil Enns)
Sunset light washes over rock fins in Arches National Park, UT, on Saturday, Feb. 23, 2013. (Photo/Neil Enns)
The fins shot was taken at 6:01:39 PM, less than a minute before the sun slipped behind the far mountain range and all the side lighting was gone.
Canon 5D Mark II with 70-200 f/2.8L IS II. 168mm, ISO 100, 30 sec. @ f/32.
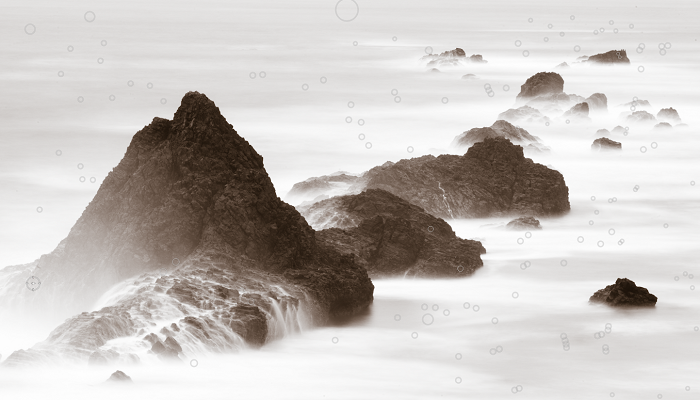
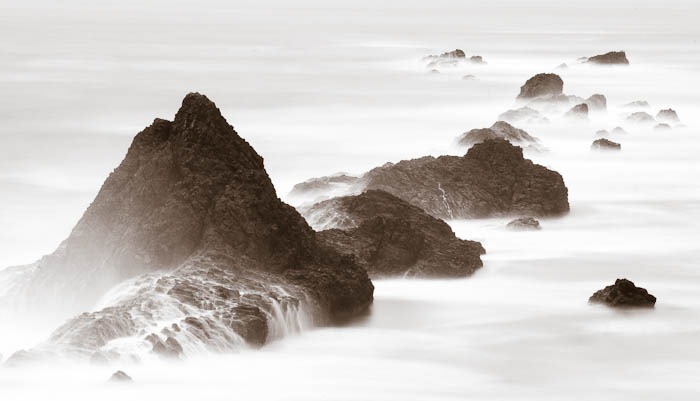
David, Vlad, Tory, and I are in Newport, Oregon, for four days of ocean shooting. That’s the good news. The bad news is the weather: flat, overcast, skies and lots and lots of rain. We did manage to get out around noon today and this was my best shot from a slim set of possibilities.
It doesn’t reproduce particularly well on the blog but none of the highlights are blown out. Promise!
Canon 5D Mark II, 70-200 2.8 IS II at 200mm. ISO 400, 1/125 sec. @ f/2.8.
(Just going by the numbers I’m guessing I handheld this one! Thank goodness for IS lenses.)
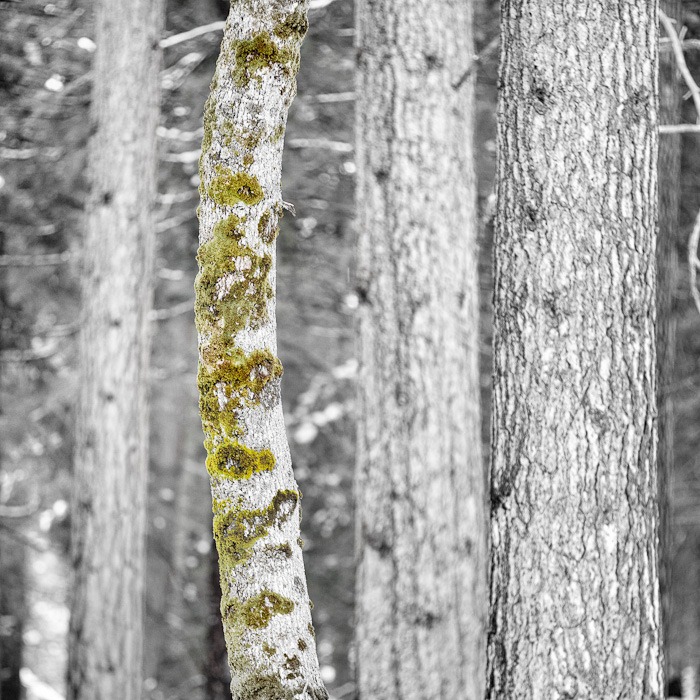
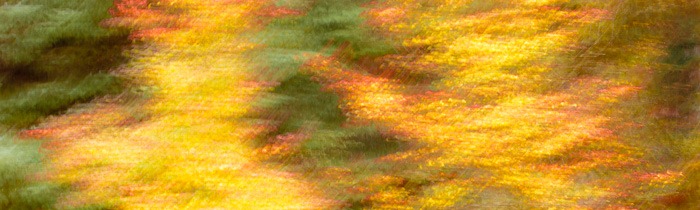
I saw this curvy tree from across the road and spent about 5 minutes walking back and forth trying to get the right position of it against the others in the background. The above interpretation is really just more explorations of Silver Efex Pro 2.0. As you might have guessed the new version adds support for selective colour. I’m liking how it looks in this image, but I definitely have more work to do.
Things I don’t like about the above version:
The tree on the right is too bright and competes with the curved tree. It looks too far forward in the frame. That’s a relatively easy fix: just darken that side of the image to make it recede.
The bottom left looks like it has a bright white ghost hiding in the trees. Again a simple burn will take care of that problem.
The overall image seems to light to me. That was just my bad on the processing side and can be fixed with a few slider tweaks here and there.
Still, as a proof of concept I like where it’s going!
Canon 5D Mark II, 70-200 2.8 IS II with 1.4x extender at 280mm. ISO 100, 1/60 sec @ f/22.
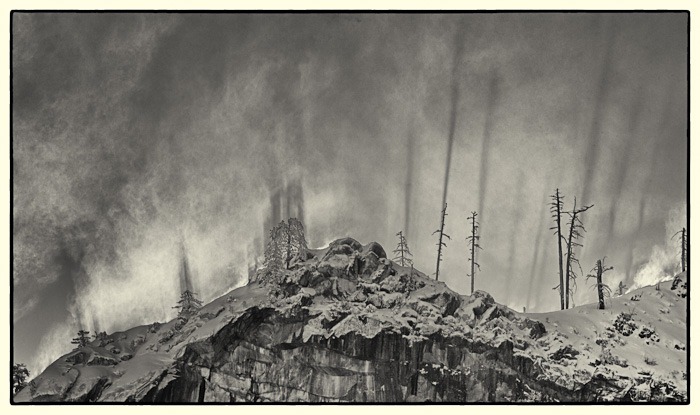
Last weekend I had the pleasure of going to Yosemite National Park for the very first time. Three other photo friends joined me for four days of shooting, eating, and playing Scattergories. We expected some snow, but didn’t count on getting two feet in two days. It made driving a bit of a challenge!
The above image is from sunrise on the 3rd day of our trip. I have to admit that for the entire trip I really wasn’t feeling in the groove. The scenery is amazing but it’s all been shot before. Many, many, many, times before. By people far more talented than me.
But after I got home and flipped through my photos I have to admit I was pleasantly surprised. I didn’t realize it at the time but my mind was in B&W mode the entire trip and my top images reflect that. I’m still not convinced I have any portfolio-worthy shots, but there are definitely fun images that make me smile.
The above photo is one of two treatments I’ve done on the same base image. All processing was done in Silver Efex Pro 2.0 as a way to try and learn the program. Don’t like the above version? Try this one on for size instead:
I’m not entirely happy with either one but do see that potential is there. So… back into Silver Efex for a third attempt:
Not bad, but man, do I ever need to clean my sensor!
Canon 5D Mark II, 70-200 f/2.8L IS II. 88mm, ISO 100, 1 sec. @ f/11.
The last three times I’ve been to the Hoh rainforest I’ve taken my camera and David’s 14mm lens and nothing else. That’s resulted in exactly one worthwhile shot.
Today I tried something different and took my camera with the 70-200mm. I was going to bring my whole camera bag, but… it was raining. A lot. So I took an umbrella-ella-ella instead.
There really wasn’t much to shoot, so we resorted to standing around and playing with texture and patterns. We must have looked pretty silly! All three of us would stand somewhere, press our cameras up to our nose, and start waving them around in the air.
Each of us came away with at least one image that we really liked though. Mine is above. From a processing standpoint, the neat part about this image is that all the edits were done using Paddy for Lightroom and a BCF2000. Fun!
Canon 5D Mark II, 70-200 f/2.8L IS II. 70mm, ISO 50, 2 sec. @ f/32.
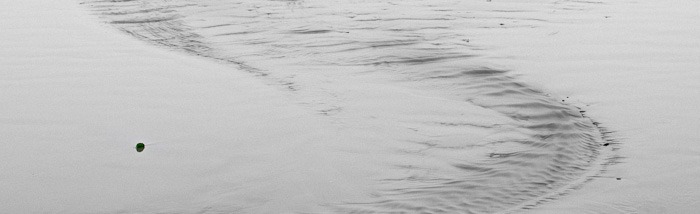
We spent early Saturday morning shooting at Ruby Beach. In the rain, of course. We’ve been to Ruby twice before, and both times I wasn’t super impressed (although I did get a sweet self-portrait on the first visit).
This time was different.
As soon as we got to the beach I noticed an odd part of sand where wave water washed back out to the ocean in an arc. I immediately saw a composition with the arc in a relatively wide crop. I set up my tripod and fired away. At one point a leaf made a guest appearance on the left, and I knew I had my image. I managed to squeeze off four shots before a wave came in and the leaf was gone.
I didn’t even have to get back to the room to know I had my image for the day. The rest of the beach shooting was just absent-minded screwing around.
The trouble with this image is that it’s completely pointless to view it on a computer monitor. The leaf is actually green, but you can’t really tell that. There’s film grain across all the smooth areas that brings a lovely texture to the image, but you can’t really see that either. It’s a shot that just demands to be printed, and I’ll do so as soon as I get home.


")
")
")
")
")
")
")